While you're there, be sure to check out all of her yummy recipies! She makes fantastic desserts and the most beautiful tablescapes!
Saturday, March 6, 2010
Giveaway!!!
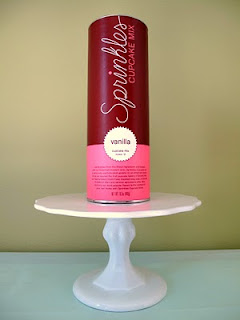
Did I get your attention? No, it is not my giveaway, but my blogging friend Naz. Head on over to her blog, Make it, Bake it, Create it and enter her first giveaway! What's up for grabs? A cake stand by Rosanna Inc and a cupcake mix by Sprinkles!
Friday, March 5, 2010
By the Dozen Egg Swap
Christine is hosting another fun swap.... By the Dozen Egg Swap! Check out her blog for more info.
What camera did I get?
A few days ago, I asked for suggestions on purchasing a good quality point and shoot. When working on my post, I googled "camera" images. The first one that popped up was a basic picture of a camera. What's funny is the picture that I posted is basically the same camera that I happened to purchase. Well, I think mine is a newer version.
It's a Canon PowerShot SX10 IS.
I am so excited about this camera! It has so many options and settings that my other (very basic and very old) camera did not have. It's pretty high tech for someone like me, but I'm determined to learn! I'm loving it so far!
It's a Canon PowerShot SX10 IS.
I am so excited about this camera! It has so many options and settings that my other (very basic and very old) camera did not have. It's pretty high tech for someone like me, but I'm determined to learn! I'm loving it so far!
What's in my Fruit Stand?
Remember my Fruit Stand Rehab post from Wednesday? Click here to see what it looked like before. I know I promised that this post would come yesterday, but yesterday turned out to be one of those days. So, here it is today!
1. Cut a long length of twine.
2. Open an egg and place one end of your twine inside the egg and snap it shut.
3. Begin hot gluing the twine all the way around the egg. It worked best for me to start in the middle and work my way down to one end, then, with another piece of twine, starting at the center, work my way to the other end.
That's it!
Isn't it cute? I wanted to make something springy for my table, but typical springy decorations incorporate pastels which wouldn't go with my decor. These little eggs are so easy and cheap (which I love) to make! You can buy all your supplies at Dollar Tree. All you need is twine, hot glue, and easter eggs (the kind you fill with candy). Although it's super easy, I have to admit, it took be about 20-30 minutes to do each egg. That's why my fruit stand is not completely full yet!
I didn't take pictures, but the instructions are easy.1. Cut a long length of twine.
2. Open an egg and place one end of your twine inside the egg and snap it shut.
3. Begin hot gluing the twine all the way around the egg. It worked best for me to start in the middle and work my way down to one end, then, with another piece of twine, starting at the center, work my way to the other end.
That's it!
TOTAL SPENT FOR A BEAUTIFUL SPRINGTIME CENTERPIECE?
Fruit stand from Goodwill= .99
Twine from Dollar Tree= $1.00
Easter Eggs from Dollar Tree= $1.00
Spray Paint= on hand
glue gun/ glue= on hand
________________________________________________
Total= 2.99!!!!
Wednesday, March 3, 2010
Broken Camera
Well, yesterday, my sweet Elizabeth got a hold of my camera and threw it on the floor. The battery door will not stay closed. I've been "dealing" with this camera for a couple years now, wishing for another one. Hopefully, this weekend we'll be able to shop for a new one.
What camera do you have that you love?
Here is what I'm looking for:
1. I want a point and shoot. I don't think I'm ready to deal with lenses quite yet.
2. I want to have the portrait option where I can make the background fuzzy.
3. My current camera's flash takes so long to warm back up after taking a picture... sometimes 30 seconds! I would like to be able to take pictures faster than this.
I would love to hear your suggestions!
Fruit Stand Rehab
I lucked up on this wooden fruit stand at Goodwill last week for .99 cents! It was beautiful as is, but not really my style.
Last week while looking for Oil Rubbed Bronze, I also grabbed a few cans of paint in colors that I loved. One of them being Krylon's gloss in Ivy Leaf. I thought it was so pretty and made me think of spring!
I began by cleaning the wood really good. Next, I rubbed an old candle over the places that I planned to distress. I sprayed two coats of the Ivy Leaf paint and let dry overnight. The next morning I couldn't wait to get started distressing!
Here is the finished product!
I'm working on something to put in this beautiful fruit stand. Check back tomorrow!
Last week while looking for Oil Rubbed Bronze, I also grabbed a few cans of paint in colors that I loved. One of them being Krylon's gloss in Ivy Leaf. I thought it was so pretty and made me think of spring!
I began by cleaning the wood really good. Next, I rubbed an old candle over the places that I planned to distress. I sprayed two coats of the Ivy Leaf paint and let dry overnight. The next morning I couldn't wait to get started distressing!
Here is the finished product!
Monday, March 1, 2010
Oh, How I love Oil Rubbed Bronze!
I've seen so many bloggers using the color Oil Rubbed Bronze (ORB). I loved the look ORB gave their things, so I had to give it a try.
I've been dying to do something to my kitchen for the past few years. Since we don't have the time or budget for a kitchen overhaul right now, I thought I could spruce it up a bit by replacing the hardware on the cabinets. I had awful white knobs that stuck out like a sore thumb. (please excuse the mess!... I guess this just proves that I'm a real person! :) )
I knew I could easily run to Target and buy new inexpensive knobs, but I wanted to make it more fun!
I think it turned out beautiful!
I've been thinking of several more things that I can do with Oil Rubbed Bronze. Stay tuned!
I've been dying to do something to my kitchen for the past few years. Since we don't have the time or budget for a kitchen overhaul right now, I thought I could spruce it up a bit by replacing the hardware on the cabinets. I had awful white knobs that stuck out like a sore thumb. (please excuse the mess!... I guess this just proves that I'm a real person! :) )
I knew I could easily run to Target and buy new inexpensive knobs, but I wanted to make it more fun!
I found some Rustoleum spray paint in Oil Rubbed Bronze at Home Depot (then I saw it cheaper at Wal-mart). I removed all of my ugly white knobs and then got busy spraying! Luckily, our weather was perfect for spray painting this weekend.
Don't they look amazing? Well, they would look more amazing once I redo the cabinets, and flooring, and paint, and countertops... you get the picture!
I was so excited with the way they turned out that my mind started racing to see what else I could do with ORB. I remembered a clock I picked up at Goodwill for $1.99 a couple of weeks ago. When I first brought this home, my husband thought I was nuts.
I had planned to spray paint it pink for my daughter's room, but thought it would be more versatile in ORB.
I think it turned out beautiful!
I've been thinking of several more things that I can do with Oil Rubbed Bronze. Stay tuned!
Subscribe to:
Posts (Atom)


