Tuesday, March 30, 2010

Easter Basket Swap

I recently participated in Miss Rhea's Easter Basket Swap hosted by Miss Rhea.  It was so much fun!  She asked us to decorate 2 yogurt cups to make them look like miniature easter baskets, then fill each with 5 goodies to send to our partners.

This basket I received from Dolly.  She filled a bag with notecards, ribbon, a hankie, and paper tags.  So cute!


This is the second basket I recieved.  Vivian filled this beautiful basket with handmade felted animals and easter eggs.  I was amazed at the detail with these animals!  Wow!


Here are the baskets that I sent out....


Thank you Miss Rhea for hosting this fun swap and thank you Vivian and Dolly for the wonderful baskets you made for me!

Button Working

A few blogger friends brought it to my attention that my button was not working. I found some time to play with it today and I think it is now working. Can someone let me know?

Monday, March 29, 2010

Be Grateful

A few months back we moved our bedroom into what was previously our dining room.  I know, sounds funny, but we have a walk through room off the kitchen that we used as our dining room before.  When Elizabeth arrived, our guests had to stay in our bonus/ junk room on a futon.  We really hated to do this to our guests, so we did some shuffling around.  Our main room of the house is long, allowing us to put the dining room table on one end and our living area on the other. 

Once we moved the dining room, I had some decorating items that are not being used any longer.  I contemplated giving them away, but thought it would be fun to find a way to repurpose them.

This was a wall decoration that was in the dining room.  I love it, but am getting tired of the whole mass produced look.  I'm planning on slowly getting rid of all mass produced- looking items in our home.

And here is what it looks like now....


It's amazing what some scrabook paper, mod podge, and ribbon will do.  Oh, and remember the Scrabble game that I found here

Recently we have decided to work towards putting our house on the market and look for a larger home, but it is making us a little impatient and frustrated with what we have now.  Hopefully this will remind us to BE GRATEFUL for our little house!
The Girl Creative


Keeping It Simple
Sumo Sweet Stuff

Is anyone else having trouble?

Is anyone else having trouble with blogger today?

I'm having trouble viewing pics on existing posts on my blog and others'.
Also having trouble uploading pics.  Everytime I upload one, it is a square with an "x".

Anyone else?

Friday, March 26, 2010

Something New

I've added a new element to my blog! 

You can now "Grab My Button"!

Take a look....

If you would like to add my button to your page, copy the code on my sidebar and add as a html gadget.

Thanks to Jenieshell's Design Challenge for the awesome tutorials that helped me create this button!

Thursday, March 25, 2010

Cookies + Canvas= Lots of fun!

Tuesday night our church hosted a "Cookies & Canvas" night.  I had signed up to bring a sweet treat.  Since this was the first time I've brought a dish to an event at church (we've recently placed membership at a different church), so I wanted to be sure my treat was really yummy!  Silly isn't it?  Anyway, Monday, I was flipping through my new issue of Better Homes and Garden magazine and I found the perfect recipe... feminine, yet sophisticated.

Rosemary-Kissed Orange Thumbprint Cookies!

Here is the recipe....

1 c all purpose flour
1/2 c cornstarch
1 t snipped fresh rosemary
1/4 t salt
3/4 c butter, softened
1/3 c powdered sugar
Few drops of almond extract
1/4 c orange marmalade
powdered sugar for finishing touch

1.  In small bowl stir together flour, cornstarch, rosemary and salt.  Set aside. 
2.  In medium mixing bowl, beat butter with an electric mixer on med-high for 30 seconds.  Add 1/3 c powdered sugar and a few drops of almond extract.  Add flour mixture and beat until combined. 
3.  Wrap and chill dough 1 hour or until easy to handle.
4.  Preheat oven to 325.
5.  Line 2 baking sheets with parchment paper; set aside.
6.  Shape dough into 24 1" balls.  Arrange 2" apart of baking sheets. 
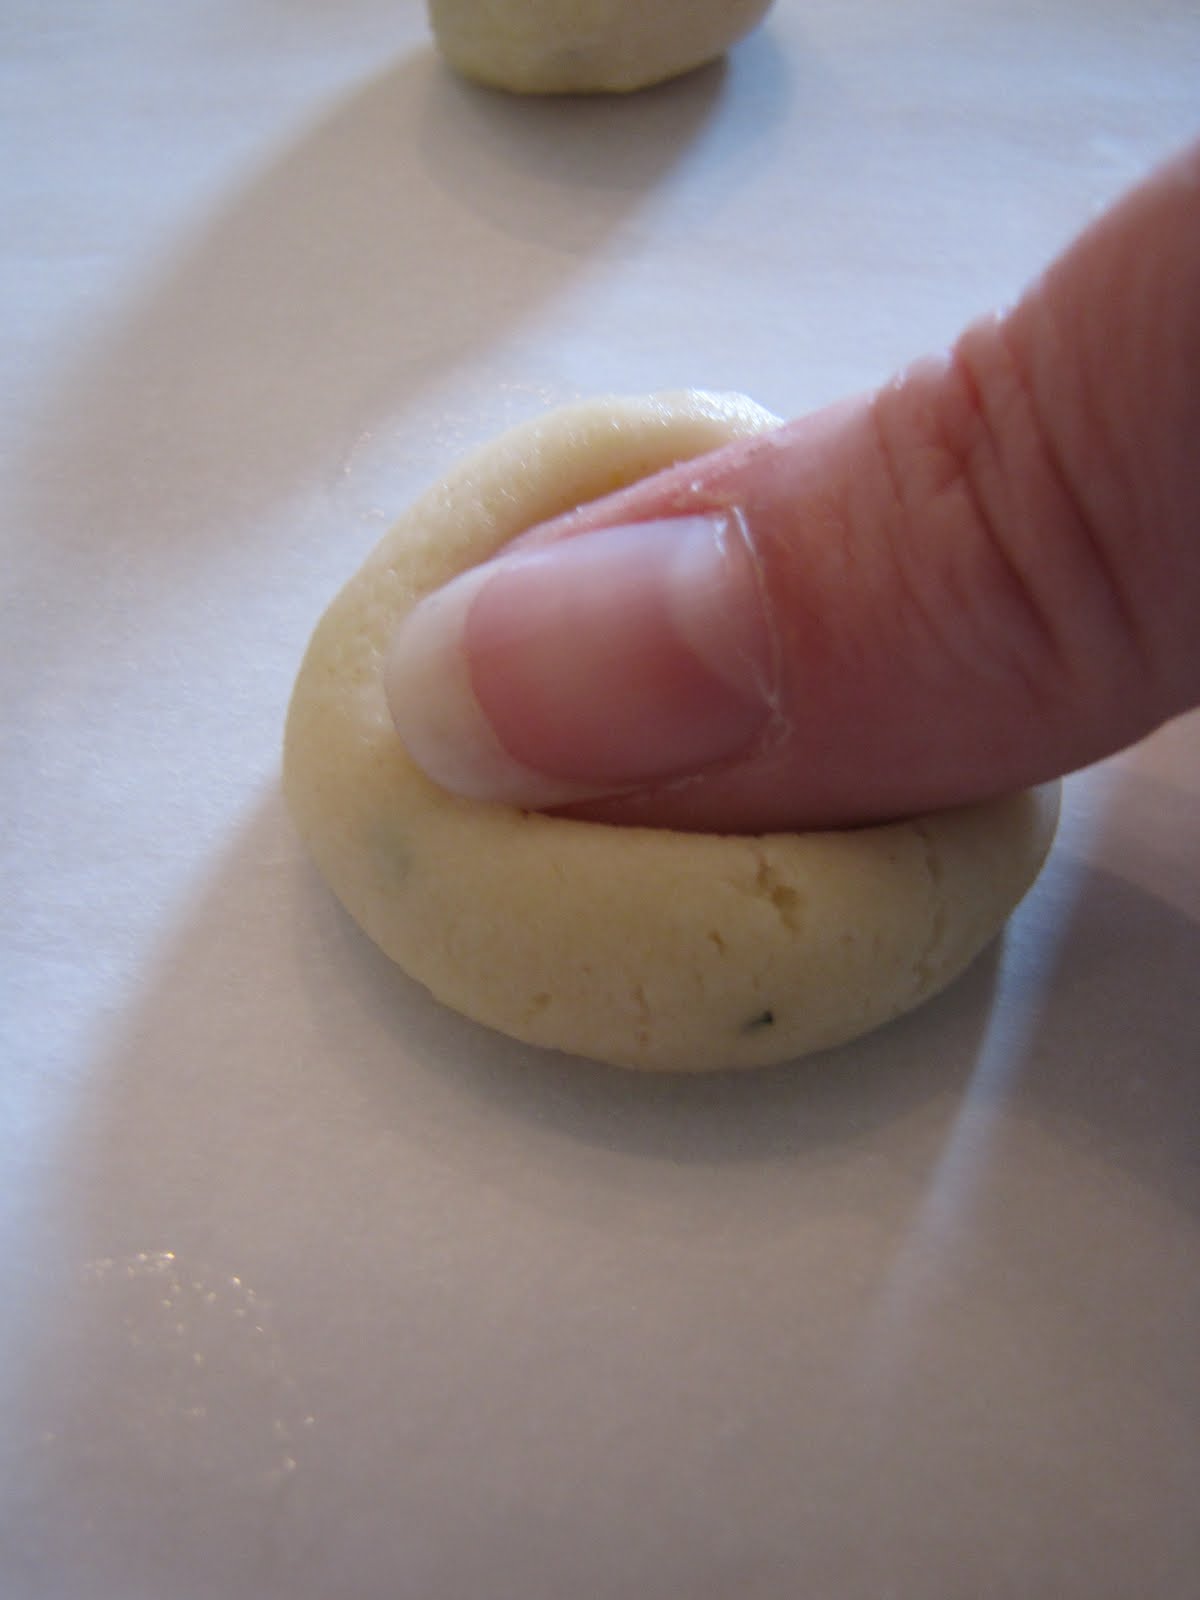
7.  Use thumb to make indentions.
8.  Spoon 1/2 t of marmalade onto each cookie.
9.  Bake 14 minutes or until edges are lightly golden.
10.  Cool 1 minute on cookie sheets.  Remove and cool on wire racks. Sprinkle with additional powedered sugar to serve.

Yield: 24 cookies

Well, if you're wondering, they went over really well.  A friend of mine was telling me that I impressed the churches "resident cook"... an older lady that is a fabulous cook...  I felt so proud! 

Oh, and here is my painting! 
Now, let me tell you, I'm no artist!!!!  We had an awesome instructor who taught us some basic techniques as she went through the steps.  She let us use whatever colors we wanted.  I tried my best to match our living/ den area.  I think it will look perfect!  Now I just need to frame it.


Tuesday, March 23, 2010

Fun Quiz and GIVEAWAY

Tracie at Beneath My Heart is hosting a giveaway to My Design Guide.  5 people will win a $50 gift certificates for their services.

I just went to their site and took a fun quiz to see what my design style was.  My result was Traditional/ Country with some Coastal Elements.  I think this describes me to a T!!! 

Head on over to Beneath My Heart and enter her giveaway.  While you're there, be sure to check out My Design Guide.

Monday, March 22, 2010

Empty Wall Space?

Do you have an empty wall that is screaming at you to put something on it?  I did.

But now, it looks like this!
This was so easy and quick!  I found these frames at Dollar Tree a few weeks ago.  They actually were from Walmart, but somehow Dollar Tree got ahold of them.  I loved how their simplicity and the fact that they were matted.  I printed up some pics of our daughter on snapfish.  The hardest part was waiting for my pictures to come in the mail! 

Once I got my hands of the pictures, I just put them in the frames, figured spacing and nailed the ribbon into place.  That's it!
 http://linda-coastalcharm.blogspot.com/

Saturday, March 20, 2010

I was featured!

Yesterday I was so excited to see that Michelle from Someday Crafts featured my Veggie Steamer (aka Coffee Filter) Burlap Wreath on her blog! She was featuring wreaths that caught her eye and mine was one of them.  This is especially exciting to me because her blog is one of my favorites AND this was my first time to be featured on another blog.  Click here if you would like to see her post.  Also, while you're there, check out the rest of her blog.  She always has great ideas!

I finally get to put one of these buttons on my sidebar!  Yay!
Photobucket

Thursday, March 18, 2010

Favorite Things Friday

Jessica over at A Few Of My Favorite Things invited me to participate in her Favorite Things Friday link party.  I headed over to her blog to see what it was all about.  In her post, she wrote about one of her favorite things... blogging, and the reasons why. 

My post is going to be about my favorite things this week.

1.  My husband, Daniel-  He is a wonderful partner.  He is my best friend.  Although I cannot comprehend how much Christ loves me, I get a glimpse of that love in the way Daniel loves me.  He is a wonderful father to our daughter.  He doesn't mind helping with any household task (Tonight he helped me prepare dinner because there was a lot of chopping involved).  He is fun.  He works hard to provide for us.  He sees parenting our daughter as a 50/ 50 responsibility.  I could go on and on.  Here he is eating one of his favorites: chocolate chip cookies.

2.  My daughter, Elizabeth Joy- She is such a joy to us!  This week has been a big week.  We turned her car seat around to face forward.  We were not sure how she would react to it... or if she would react at all.  We decided to have a family outing to get yogurt once the carseat was situated.  We were not prepared for her reaction.  She had the biggest grin on her face and had the deepest belly laugh.  She was so excited to be able to see us while we were driving.  I love that belly laugh!!!  Isn't this the best smile ever?


3.  My faith.  I am participating in a ladies bible study at our church on Wednesday nights.  The study is called Walking by Faith- Lessons Learned in the Dark by Jennifer Rothschild.  One verse that stuck out to me this week was Deuteronomy 10:12- "Now, O Israel, what does the Lord your God ask of you but to fear the Lord your God, to walk in all his ways, to love him, to serve the Lord your God with all your heart and with all your soul".  This is ALL that God asks of me!  After everything he has done for me!  All I have to do is love Him, serve Him?  Sometimes I feel as though my relationship with God has to be a complicated thing.  I feel unworthy (which I am) and  I feel like I am not doing enough (which I never will). 

This verse has centered me this week.  It reminds me where my focus needs to me.... on Him.  Not everything else that needs to get done during the course of the day.  Once my focus is where it needs to be, everything else will fall into place.

4.  Thrifting/ Junking- I have always loved going to flea markets and thrift stores.  I love finding the beauty in something that others may have seen as junk.  It's a good thing I enjoy rehabing things... our house is full of flea market and thrift store finds!  Here is a something that I picked up at Goodwill and turned into a wreath.

5.  Sewing/ Crafting- I began sewing when I was around 10.  The first thing I made was a cape for my Barbie.  Thinking about this now is pretty funny considering I give my husband a hard time about his love for Superheroes.  Anyway, I love fabrics and putting together the unexpected.  Below is a picture of a onesie that I embellished last week.

6.  Blogging- I never thought I would be a blogger, nor would I ever read complete strangers' blogs.  I have  a friend who has always loved reading blogs of people she doesn't know and then telling us stories like they are someone she knows.  I always thought it was crazy and here I am doing it, too!  I'm still a newbie in the world of blogging, but it has been so much fun to connect with women out there who share in my same interests and who challenge my creativity.


Old Coffee Filter + Burlap = Great Wreath!

UPDATE: I've been corrected... it's actually an old veggie steamer!  I guess this shows that I'm not a coffee drinker! :)  Thanks girls!

Back a few weeks ago I found this old coffee filter (at least that's what I think it is) at Goodwill for $1.49.

I loved how rustic it looked and I figured I could do something with it.  Yesterday, a piece of burlap just happened to be laying next to it and I knew they would be a match made in heaven. 

The picture above shows it in it's opened state.  It also would close up with just the slightest movement, so I needed to find a way to secure it open so I cold turn it into a base for a wreath.  I chose floral wire because it is thin and easy to work with.  Once it was secure, I basted a strip of burlap in order to make a ruffle for the center of the wreath. 
For the florettes around the center, I cut circles out of burlap and two coordinating fabrics.  To make them look worn I dampened them and wadded them up.  Got the handly glue gun out and went to town.  I love vintage buttons and have a large tin of them that my mom gave me.  I chose several that I thought would coordinate and glued them in the center of the florettes.

There you have it!  An inexpensive wreath made from an old coffee filter.  Who would have thought?... certainly not me.


Here is a close up of the center.....

Another close up.....

Now to paint my front door.... I'm thinking chocolate brown. 

Linking to:
2nd Time Around Tuesday @ A Picture is Worth A 1,000 Words


giveaways


 http://linda-coastalcharm.blogspot.com/


The Girl Creative

Wednesday, March 17, 2010

Spray Paint and Burlap

My mom gave me this picture a few years back.  It's not really my style (and we're not coffee drinkers), so I'm finally doing something with it!
                                                                   
                                                                    BEFORE:

I began by taking out the picture so I could paint the frame.  The frame was beautiful and solid wood, but I wanted to add a little color to a large wall in our dining area.  I loved the color Ivy Leaf that I used on my Fruit Stand Rehab, so I decided to use it again.  Plus, I thought it would be a good way to pull it all together.  I sprayed two coats of Krylon's Ivy Leaf.  The next day I distressed it by sanding and applying Mocha glaze by Valspar. 

I've been dying to do something with an old piece of burlap that I've had laying around, so I covered the original artwork with the burlap.  I also had this metal "J" that I got at Kirklands a few years back that had been collecting dust, that I decided to use in this project.

AFTER:


Oh, and there's the Fruit Stand!

It's amazing what a little paint and burlap will do!

Linking to:
Photobucket 
giveaways

 
3 Column Dark Minima Template by GlamourBomb

Back to TOP